Sunday, 28 November 2010

Dear Santa, instead of the usual lump fo coal....

Can I PPPLLLLLEEEEEAAAASSSSSSSSSEEEE have one very amazing and required Shu Uemura Atelier Makeup Case!!?!!??!!!
ATELIER MAKE-UP BOX - makeup cases
If my sexy, hairy, santa of 3 1/2 years who will soon be joining me in London- incredibly enough only a week before christmas- is a good boy..he'll brings me one in his sack!!
( please dont feel free to insert dirty joke here...)

This case is widely used by many a professional makeup artist. Why? No not cause its a steal at 350 quid.. eek! But because of its insulation (really protects makeup from heat etc) and storage system. A 6 tiered tray case, with really really handy pencil and smaller item storage.

Please Santa!!!!!!! Hope I've been a good girl....

xxx

Fresh.

Here are a couple of photos from a shoot I worked on with Emmie Cosser during the week. Shah from Oxygen Models had a lovely fresh look and looked amazing in great styling and a clean look comprising of a nude eye and a strong red lip, depsite sub zero temps! I changed it up a bit when the stylist wanted more of a edgier look to the clothes, by adding some liner and a stain to the lips.
The red lipstick was Lady Danger.. always a fav!

I kept her hair simple and straight, adding some texture as the clothes got rockier..


xx

Tuesday, 23 November 2010

MAC Pink 4 Friday!


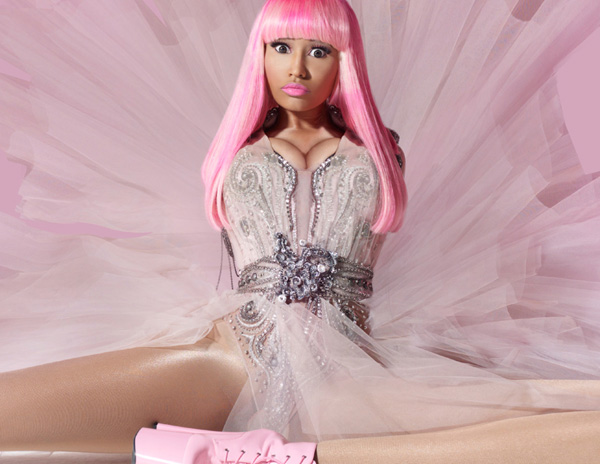
Oh my word am I excited about this collaboration! Regardless of the fact that MAC's pink lipstick range is insane, Nicki Minaj the Trinidadian hip-hop artist has worked with MAC to bring out this baby; in time for her own Pink Friday album release!

With a creamy satin finish, this pink has got alot of kick (a little deeper and brighter than MAC's Pink Nouveau). Im every excited to grab one for myself and my kit. only available on Fridays at MAC for the next month- get in kids!!

Nicki says, “MAC’s Pink Nouveau was my favourite lipstick for years, but it’s all about Pink Friday!”


xxx

Sunday, 21 November 2010

Basic Brush kit

I know before I really got into my makeup I didnt really get why there was a massive need for
makeup brushes. With each face I create I understand the importance of having the right tools.
Clients always ask what are the most basic amount of brushes that are needed to carry off a look.

No, Im sorry people, those revolting excuses of a face brush you have been using for 3years, for which in that time you have not even thought to wash or replace- just wont cut the cheese!!

Im gonna lay it down straight and easy for you.

1. Buy quality brushes. Yes, they may be expensive, but they wont drop hairs all over your face, nor will they go to hell on you within two uses. Why buy a cheap brush, when you normally have to replace them after a year? Buy a quality brush, look after it and its yours for life!

2. Wash the things!! Yuck, yuck, yuck, yuck yuck is all I can say for the vast majority of you. Let me guess- you have never washed your brush/es? Well, imagine each time you use your brush, you are transferring oils, pollutants, germs and dead skin from face to brush. And then each time you use it again, your just moving all those nasties all over your face.

Its SO important that at least once a month you get your brushes, wet them with warm water and lather them up thoroughly! Either with shampoo or dish washing liquid (I use antibacterial fairy liquid..), rinse thoroughly, smooth out the hairs and leave to dry on a flat surface.
Give MAC's Brush Cleaner is brilliant to use in between washes. Particularly for your foundation brush, which will tend to clump and cause the application is be streaky.

3. Use them the way the Makeup Gods intended! Dont press the whole brush down on your face, causing the hairs to splay out and dont think the way to best use them is to press hard.
You should be only putting the product down on the very tips and pressing/sweeping/patting/buffing the hairs on the skin in a way that allows the brushes to do the work. When you sweep a brush on your face, remember that theres a high chance that your just flicking the product out the other end and not putting it where it should go! Press it, pat it, lightly sweep but dont waste!

Ok! So to the magically numbers.. There are a number of makeup houses that produce amazing brushes (Smashbox, Armani, Bobbi Brown) but I work with MAC brushes all day, everyday and know that they have any and every brush you need. And the quality is undeniable.

So...Im not going to recommend a brush if i dont genuinely think you need it. Yes, they will give a better finish, yes its more hygienic and yes it allows you to do more. Dont misinterpret me and think I dont like using my fingers- for certain applications, they work wonders! But the below brushes are crucial!

#187


Genius!! Puts down enough product to do the job, but doesnt require lots to give you good coverage. Really lovely airbrushed look for both foundations and powders (liquids, creams and powders). Bring the very tips of the white fibres down on the product at an angle similar to the pic. Buff product onto the skin!

#129


Great powder brush! Big enough to put it on down, but not too big that it doesnt allow you to get in and around the nose etc. And yes! as the pic suggests, you can use it as a blush brush (if youre on a massive budget..)

#168


Great blush brush, with fluffy natural fibres. Gets right under the cheeks, to sculpt them out as well as for the apples of the cheeks!

#217


As previously raved about- LOVE IT!! Great alrounder for the eyes.. Use the flat of the brush to put down heaps, or angle the tip to get a really precise app in the socket. Also- can it be known, yes other artists would recommend an actual concealer brush but uhuh not me. This puppy is wonderful at putting down a lovely amount without caking on the product.

#266


Im so obsessed with Fluidline gel liner for the eyes, this brush does it so well. great for those starting out as it has great control. Also a good brush to apply colour onto the brows..

So there you have it kids!

Yes there are others i highly recommend but Ill give them to you in drips and drabs. These are the brushes you should have- essential in fact!

xx

I effing LOVE this Lady!!

Could she inspire and captivate me any more....! Pat Mcgrath's magic is usually spun when theatrics are involved. Through textures, textiles and talent, this woman has created some if the most insane looks for anyone worth noting.

This visual from Galliano's Paris S/S 11 show is classically French and classically Mcgrath.

#sigh#.....


Off to research....

x

Tuesday, 16 November 2010

Sigur Ros


This music takes my breath away. Makes me weepy infact.
I cant get enough of the album. Please indulge xx

Yves Saint Laurent

I love this man. The more I understand fashion and the more I absorb it, the more I draw on YSL's story as inspiration. Sadly passing away in 2008, he left behind a fashion house with many successful branch companies.


This Algerian born, French designer didnt become Dior's successor at age 21 for nothing. His sketches BLOW MY MIND. The fact that YSL came from nothing, had some terrible career lows to rise and become one of historys most respected and admired designers, says a great deal about him.


I had the privledge whilst in Paris a couple of months ago to see his exhibit. Beautifully presented at the Petit Palais Museum by YSL's life partner Pierre Burge; I found the exhibit simply breathtaking. Ben, my lovely boyfriend also found it really interesting.. a great mix up of art and fashion. The biggest impact was through his Evening gowns and my favourite- his stunningly silouhetted black masculine suits, for which he's famous for. Perfectly described by Berge,

"Chanel liberated women, but Yves Saint Laurent empowered them."

And his amazingly strong shouldered streamline suits do just that. I also found the
 photo series by Jeanloup Sief incredible. Find one of the more published shots at the beginning of this post!


I also managed to sneak an illegal pic of the YSL's Andy Warhol...love it!


xx

Sunday, 7 November 2010

The light and shade...

One trick of the trade that every makeup artist uses and sometimes you do as well (sometimes without thinking!) is contouring.

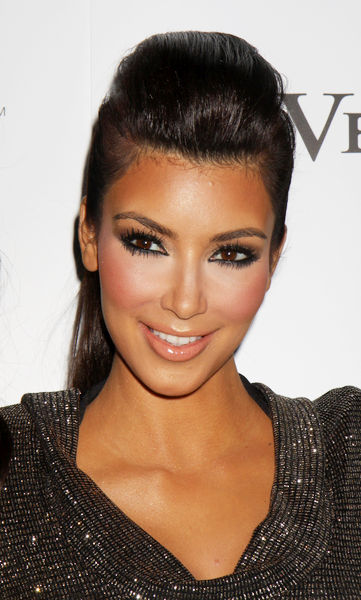
Whether its to slim down a rounder face, chisel out the cheekbones, narrow and shape a nose or change the demensions of a face, contouring is a really important step when doing your makeup. Below are some examples of contouring- from the extremes to everyday wear..


                                                           Vivienne Westwoood RTW
Kim Kardashian

Preen NYFW SS 2011


To ensure your contouring your face shape correctly .. analyse your face first! Stand in front of the mirror and assess your angles. Have you got a round, square, oval or heart shape? Have you round cheeks or a long jawline? Have you a wide forehead or a wider jaw, in comparison to the rest of your face?

Like I have mentioned before, when you put a darker colour on your face it takes back that area. When you put a lighter or highlighting colour on, it will illuminate it and bring it forward. So use this theory when applying your bronzer.

To lean out your face take your bronzer or darker powder and sculpt out your cheekbones by shaping the colour from the top of your ear down towards the corner of your mouth. By pressing the brush into this area you can feel where your cheekbones are. Dont but this darker colour on the cheekbone.
If you have a wide forehead, narrow it by applying the bronzer to your temples. If you have a high forehead, brush the colour along hairline (notice the first two images above has been done this way).

For someone who wants to slim down and define their nose brush the bronzer from the underside of your eyebrow at the top of your nose and shade down the side of your nose, rounding the brush around the underside of the tip of your nose. Any part you find protrudes more, shade the colour in that area further.
For those like me who wants to define their jaw more, shade under the jawline.

And now to highlighting! Highlight areas include.. Highest point of your cheeks (imagine an C from outside point of the end of your eyebrow down to underneath the eye on the cheekbone. Put highlight down the bridge of your nose, in the corner of your eye, on your cupids bow (centre section on the top of your lip) and depending on your eyeshape, underneath your eybrow.

BEST MAC PRODUCTS TO USE:

Bronzers:
Refined Golden
Mineralised Skin Finish in Medium Dark (or 1-2 shades darker then your normal shade)

Blush:
Tenderling
Coppertone
Cubic

Highlighters: 
Vanilla Pigment (so so versatile..)
Soft and Gentle Mineral Highlighter
Gold Deposit (Dark skins)
Shell Cream Base

If you have dark skin and find it almost impossible to find a bronzer to help contour, depending on your shade, try a mineralised skin finish, Deeper Refined bronzer. And if your skin is very dark; try Carbon or Embark eyshadow!
Hope you find this works for you, because trust! Its an amazing tool to use in your makeup routine (and once used to it, takes virtually no time..)

Love xx

Thursday, 4 November 2010

Not a Romantic Mixed Tape


She bet me to the shoutout!
My good old dear friend Jemma Michelle; whom I once had many a laugh with in high school, has been of late, a true inspiration.

This chick knows style.. dont you worry about Alexa or Chloe. This girl has it down.

She made sense the day she started up her blog 'Not a Romantic Mixed Tape'. A blog where she inspires others with some lovely fashion pieces, art and music; Jem understands how fashion works and does so, in a way, that leaves others behind. With her facinating eye for fashion and strong key pieces written beautifully and subtly (which comes from her strong writing/creative background), this blog is one I find myself clicking onto regularly.


Enjoy xx

Artist Tip!

Ok, so like I mentioned in my first blog, the reason I wanted to start this page was due to the lack of information I failed to find when I was getting into my makeup all on one site. Also, I hated that I could never find any tips from other artists, about what they like, products they used etc, unless it was on a companys website. I love them, but I wanted to hear the real deal. What they really use and why..

So I've asked a few of my fellow Mac Dolls to collaborate with me once a week to give you guys an insight into their fav products, some of their tips and tricks and some key looks that tickle their fancy..

So this week, Ive asked Gemma W, an artist who I work with for any tips she has for y'all...

The lovely Gem said her top 5 MAC products were:

1. #217 brush
2. Smolder Eye khol
3. #44 Lashes
4. Strobe Cream
5. Lip Primer

On my constant quest to drag as much info out of the other artists daily, a question I always shoot at them is.. If you forgot your brush kit to a job and could only have 1 brush to do the entire look, what would it be.. Most have said the #217. And too right. Its amazing!!


So! Back onto the lovely Gem and her tips and tricks!

I asked her what her fav foundation was and she said she loves Studio Fix Fluid. She loves to mix it with her Strobe Cream to give the skin a glowing look- though the foundation mattifies* it. Thus making the skin look healthy, but removing shine and creating a flawless finish that lasts all day!

Sometimes when we use a mattifying foundation on clients, it can look quite flat. Gems trick to add the strobe cream either under as a moisturiser, or mix it with the foundation will still enable the Studio Fix to mattify; but it wont dry the skin out or make it look one dimensional..

Hope you enjoyed Gem's tips.. Thanks sweetheart x

*mattifying means to remove shine, highlight or gloss. Great for skin thats oily or throws off shine as skin wears throughout the day.

Another artist tip next week!

Love xx

Tuesday, 2 November 2010

Channelling Chanel

Chanel Spring/Summer 2011

Tomorrows look on counter... beautiful.
x

My first English winter..

Unprepared, as usual, Im becoming frightened. I have yet to experience an English winter and by all advice- I should be very very scared. Already, as Autumn ends its getting dark by 5pm and rarely the sun is out for longer than an hour or two. Nievely Australian, I walk outside to the shops in flip flops and a top with a flimsy scarf  to sheild me from what I believe, is a chilly air. I then step outside...WHAM!

Oh dear lord...

I am now beginning to get it. These crazy kids over here dont wear Ugg boots to work for no reason. Its cold god dammit. So happy am I to know that Uggs can be replaced in the workplace by a far more fashionable weather protectors. Lamb Shearling in a fashionable adaptation. Whether it comes in the form of an aviator jacket or shearling lined boots.. the availability of warmer clothes and shoes are finally in stores.

Not that I could afford any of the collection, but Burberry's inspires me daily. And thank god High St stores have caught on and have a plethora of Burberry inspired pieces. So, though I should have purchased these items months ago, off I trundle to get me hooked up.

Post Script: I heart Rosie Huntington-Whiteley. So much.


xx

I was terrible at drawing inside the lines..

Even though we see coming out of fashion weeks for Spring/Summer 2011 bright, block colours- a look  that I constantly see popping up and am inspired by is the 'goth' lip.

Paris Fashion Week Spring 2011 Beauty Trend: YSL

Yves Saint Laurent spring/summer 2011

Interpreted in all matter of ways- you can go strong or you could go soft; you can go matte or you can go glossy; you could go lined or you could go soft edged. In any way- a dark gothy lip asks many things of us- one being: can you pull off this sexy number?

MAC recommendations are:

- Diva (a beautiful deep burgandy colour)
- Rebel (mixing the brighter trend with the goth..)
- Cyber (amazingly dark)
- Dark Deeds from the Venomous Villans collection
- Any of the reds mentioned in my previous post on red lips

To matte them down further, use MACs mattifying gel and pat over lip after lipsticks applied or to gloss them up, use MACs clear lip gloss.


Louis Vuitton spring/summer 2011. Photographed by James Cochrane

xx

Monday, 1 November 2010

Flick it, wing it, line it.


Giambattista Valli Ready-To-Wear Autumn/Winter 2010-11

One of the few things im petrified of in this world is walking outside without eyeliner. I walk the streets of Melbourne and London constantly wishing this person and that would just chuck a bit of liner on. I mean I dont necessarily believe that you need chunks of the stuff on, just a sublte soft smudged line is ok. If you have some balls though, go for gold. Your eye is your oyster- line the thing!

From a simple lined edge with a khol (MAC Smolder is amazing..), which can be smudged and feathered out for a soft, rocky edge; to a strong winged eye using a gel (MACs Blacktrack fluidline with the 210 or 266 brush..) you can literally create anything!

I know some look at their pencil and think one of two things:

1. When i use it, i look like ive been punched in the face.
2. I wont use it, cos where the hell do i apply it!

Well, here i am! Im gonna tell you.

Almond eyes: look, we all wish we had this eye. and if u have it- we hate you. you can wing that eye out, smudge it and rock it and itll look incredible. Do anything- I dare you!

Round eyes: you want to elongate the eye and draw it out.. rather than making it look like a big round circle when lined. Start the liner on the top, 1/3 in, where the lashes start, in a thin line, and as you reach the outter edge go thicker. Underneath- only smudge the khol softly into the last 1/3.

Small eyes: use very little kids! the whole idea of putting something dark on your face is to take it back. And when you put something light on it, itll bring it forward (eg. thats why you look skinnier in black and with a tan.. and your cheek bones look lovely with some highlighter on them). Get a small brush, such as MAC's #228 brush, brush it over the end of your khol, and then use the brush to deposit the colour between your outter bottom lashes. Then using the same brush, get a warmer eyeshadow and blend that over the top..

Heavy lid or browbone: Thin top liner (using a hard wearing product, as not to allow the heavy lid to transfer product to the top of your eye) and flick it slightly towards the outer edge. Only a small flick though!

If your not too sure where to place your flick and how long to do it.. open your eye before applying. Analyse how your lashes flick on the outside egde. Pick a spot where the lash would end and place your brush or pencil and draw back down to the line you have created. The whole effect should look like the liner is a continuation of your eyelashes..

At the end of the day, its just a matter of practice!

For those wanting a bit more of a challenging look on the eye, and keeping up with eye trends now- be edgy with it. Above at Giambatista Valli's show, the liner is very bat-winged-esk and two toned. Awesome.

Other shows for A/W 2010 that had amazing lined eyes were Nathen Jenden (also keeping in trend of contrasts), Zac Posen, Threeasfour and Jeremy Scott (my fav.)

Be inspired! x

Bat For Lashes - Daniel


Great tune and really cool vid.